
After blogging for eleven years and seven months at a WordPress site that featured my artwork, I shut it down so I can spend more time writing and keeping up this website/blog. That doesn’t mean I’ve given up on making art. On the contrary.
In my post prior to this one, I showed a graphite drawing I’d done of my Vree Erickson character. I like drawing my characters because it allows me to study their features and imagine what makes them tick.
Here then is a jaunt into that process, taken from my journal of that day.
It’s always fun to have a day to myself when I can get out my drawing pencils and sketch. I usually use HB graphite pencils, charcoal pencils, and white chalk pencils on 98 lb. mix media paper bound in sketchbooks. Currently, I use a Canson 11×14-inch acid free book, which holds up well when I switch to drawing with pen and ink or use water-based paints.
This drawing is a graphite one I did a few years ago—2018, actually—when I considered adding drawings to my book projects. It’s a drawing of my Vree Erickson character, based on a photo of a teen actor whose name I’ve forgotten. I sometimes pull images of people in the public domain off the web for my morgue files, so she’s probably in her 30s by now. If anyone recognizes her, please comment below.

I began with a light sketch and blocked in a basic shape of the girl. After I was satisfied with the proportions, I scanned the drawing for a record of my step-by-step process. Unfortunately, to show you the drawing (in the image above), which was very light, I had to play with the contrast balance to show most of the lines, which pixelated the image. But it’s a good representation, otherwise.
Next, I began shading, which I kept light. I always work from light to dark when I draw.
As I continued, I squinted at my reference photo a lot during the shading process as it reduced detail and weakened the value contrasts to a few instead of many. I learned this technique many years ago. I’m a seasoned illustrator, and some of my learning aids starting out (besides classroom teachers) were books written for the beginner illustrator. One of my favorite beginner books is The Illustrator’s Bible by Rob Howard and published by Watson Guptill. It’s a bit outdated (copyrighted 1992) when compared to today’s books on illustration, and not lengthy enough to be a bible IMO, but it taught me a lot about tools and techniques when I thought I knew everything about illustration. Anyone interested can find it at eBay and Amazon.
Another outdated gem is Watson Guptill’s ArtEffects by Jean Drysdale Green, copyrighted 1993. This one is more for the experienced illustrator: less about techniques and strictly about being experimental. Most experienced artists I know (especially the younger generation for some odd reason) HATE experimenting. They stay in a safety zone of proven techniques, which is a shame. Imagine where art would be if Whistler never experimented with technique. His paintings would never have influenced Monet, who would never have influenced the Impressionist movement.
My all-time favorite (old-geezer’s) beginner drawing book is The Sierra Club Guide To Sketching In Nature by Cathy Johnson, copyrighted 1990 (though there are revised editions on the Web). My edition deals with many techniques and mediums to sketch nature, which I’ve applied to sketching other subjects, such as portraits. After all, rendering hair is basically the same as rendering fur.
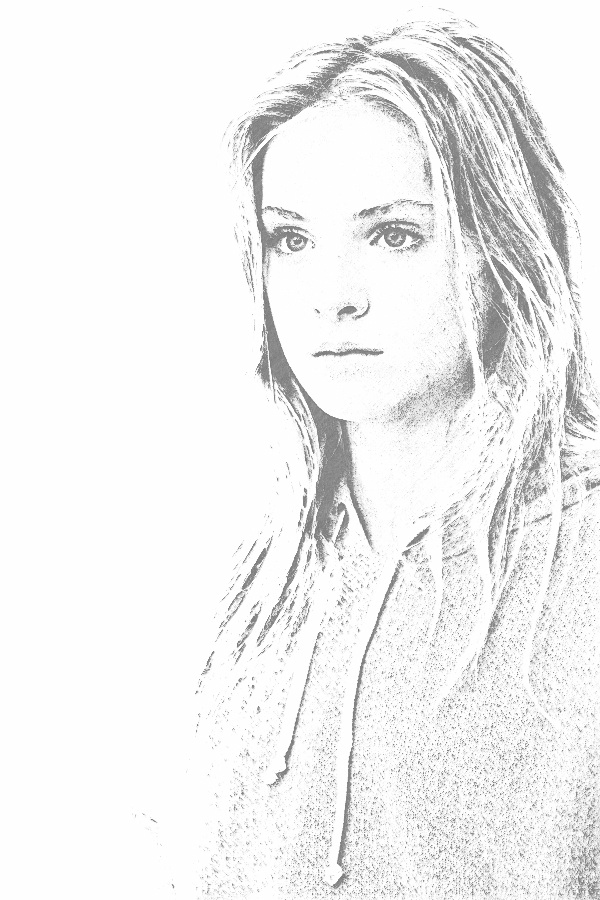
Back at the drawing board, I continued shading (shown above), adding darks and blending and softening edges in her hair, skin, and the fabric of her jacket. But since this is a portrait drawing, I concentrated on putting the most detail in her face (shown below). I stopped when I was satisfied with the overall lights, darks, and mid-tones in her face, neck, and hair. I kept the drawing loose and sketchy the further away from her face. I used the white of the paper shown in her jacket’s drawstrings and the bottom of her hair as directional devices to lead the viewer’s eyes from the bottom of the drawing to the face, which is the point of interest.

The tools I used were basic drawing instruments: paper, HB and 2B pencils, a box cutter knife to sharpen the pencils, fine sandpaper to shape the graphite’s point, and kneaded and plastic erasers. I sometimes use blending tools such as stumps, tortillions, cotton swabs, face tissue, and the sides of my fingers, but not this time.
It’s good practice to get away from schedules and simply do those things that make us happy. And drawing every few weeks is my break from writing when the process gets too serious.
So, do what you love best. And when it stops being fun, do the second thing you love doing.
That’s all for now.
Steve, 8/22/2022
This post “Doing What We Love” copyright © 2022 Steven Leo Campbell at stevecampbellcreations.com – All rights reserved.


I’d love to be able to sketch my characters.
LikeLiked by 2 people
It’s a wonderful process of getting into your characters’ minds to see how they operate, imagining their entire personalities while you draw. Very visual.
LikeLike